Adding a Google Apps for Education Account with OAuth2
I'm helping a friend setup Thunderbird with a Google Apps for Education (GAFE) GMail account (https://www.google.com/edu/products/productivity-tools/).
He would normally log into his GAFE Gmail account in a web browser using [email protected] as the username, and using his university directory password. The login process uses OAuth2 to authenticate the user.
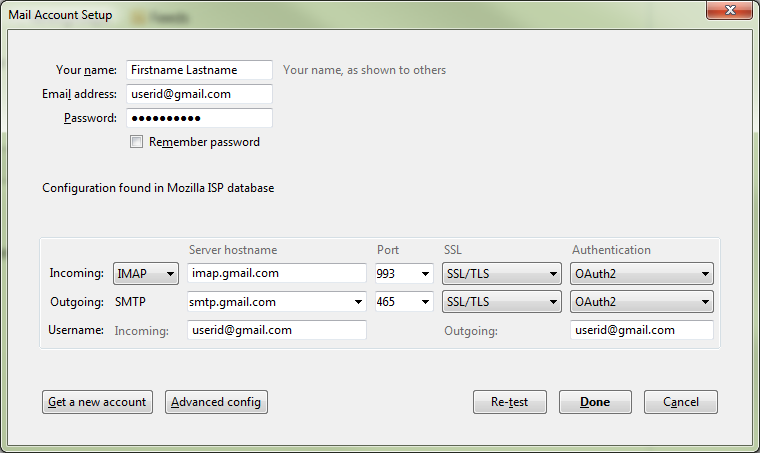
Here's the problem. When I create a new account in Thunderbird, the Mail Account Setup dialog provides OAuth2 as an option in the Authentication drop-down only if the email address is [email protected]. As soon as I edit the Email address field to [email protected], the dialog resets -- as soon as I delete a single character, in fact. It's quite jarring -- all the configuration fields simply disappear. You can see this in the two dialog screenshots I'm attaching. And if I begin the process by using [email protected], I don't see OAuth2 listed at all.
I tried using a bogus gmail email address. I can then enter the correct username ([email protected]) in the OAuth2 dialog. Then I can change the email address back to the correct value in the Thunderbird account settings. But this doesn't work -- I get an error that "The current operation on 'Inbox' did not succeed. ... Unknown command e108mb...." when I try to actually download mail.
How can I get this working? Thanks.
Valgt løsning
For what it's worth, here is how I got it working. This is with Thunderbird 45.0.
1. If the Mail Account Setup dialog doesn't appear automatically after installation, press the Alt key, then File -> New -> Existing mail account. Enter your email address as "[email protected]". It doesn't matter what appears before the '@' symbol, because you are going to change this later.
2. Press Continue, wait for "Configuration found in Mozilla ISP database, and then press "Manual Config".
3. Do *not* change the "Email address" field in this dialog. As soon as you edit it, the dialog will reset itself.
4. Change the Username field for both Incoming and Outgoing at the bottom of the dialog to "[email protected]".
5. Press the "Advanced config" button, which will open a new dialog.
6. Click on the "[email protected]" node at the root of tree on the left and then change Account Name to "University Gmail" or whatever you prefer, and change he Email address to "[email protected]".
7. Verify the settings in the "Outgoing Server (SMTP)" tree node. User Name should be "[email protected]".
8. Press "OK" to close the dialog.
9. You will be returned to Thunderbird main window. Press the "Inbox" node under the new account, and an authentication dialog with an embedded web page should appear. If it says "Sign in with your Google Account" you will need to first change the pre-filled username in the dialog from "[email protected]" to "[email protected]" and then press Next.
10. Choose "Organizational Google Apps Account" when asked.
11. Login at your university authentication page (which appears as a web page inside a Thunderbird dialog).
12. Allow Thunderbird to view and manage your mail, when asked.
That's it.
Les dette svaret i sammenhengen 👍 4All Replies (2)
And if I begin the process by using [email protected], I don't see OAuth2 listed at all.I'm surprised by that. I use a work-based gmail account that doesn't explicitly name gmail as the domain and it works just fine with OAuth2.
Valgt løsning
For what it's worth, here is how I got it working. This is with Thunderbird 45.0.
1. If the Mail Account Setup dialog doesn't appear automatically after installation, press the Alt key, then File -> New -> Existing mail account. Enter your email address as "[email protected]". It doesn't matter what appears before the '@' symbol, because you are going to change this later.
2. Press Continue, wait for "Configuration found in Mozilla ISP database, and then press "Manual Config".
3. Do *not* change the "Email address" field in this dialog. As soon as you edit it, the dialog will reset itself.
4. Change the Username field for both Incoming and Outgoing at the bottom of the dialog to "[email protected]".
5. Press the "Advanced config" button, which will open a new dialog.
6. Click on the "[email protected]" node at the root of tree on the left and then change Account Name to "University Gmail" or whatever you prefer, and change he Email address to "[email protected]".
7. Verify the settings in the "Outgoing Server (SMTP)" tree node. User Name should be "[email protected]".
8. Press "OK" to close the dialog.
9. You will be returned to Thunderbird main window. Press the "Inbox" node under the new account, and an authentication dialog with an embedded web page should appear. If it says "Sign in with your Google Account" you will need to first change the pre-filled username in the dialog from "[email protected]" to "[email protected]" and then press Next.
10. Choose "Organizational Google Apps Account" when asked.
11. Login at your university authentication page (which appears as a web page inside a Thunderbird dialog).
12. Allow Thunderbird to view and manage your mail, when asked.
That's it.


