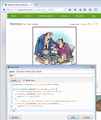
how can I disable the zoom overlay on inages
When the cursor is near or over an image on many sites, especially the comic strips I read daily, http://www.gocomics.com/herman for example, a zoom overlay appears. This is extremely annoying; how can I stop it. I don't want to disable zooming, just this overlay.
Valitud lahendus
I don't think there is a general purpose solution for this (at least, not without a very clever add-on).
In that particular case, you can use a custom style rule to modify the overlay so that the image remains transparent until you are directly over the icon. Here is a style rule to accomplish that, which you can apply using the Stylish extension or in a userContent.css file.
@namespace url(http://www.w3.org/1999/xhtml);
@-moz-document domain("www.gocomics.com") {
  /* Overlay image generally invisible on hover... */
  p.feature_item:hover span.zoom_link {
    opacity: 0 !important;
  }
  /* ...until you are directly over the magnifying glass icon */
  p.feature_item:hover span.zoom_link:hover {
    opacity: 0.75 !important;
  }
}
It's not possible to confirm from the attached screenshot, but it did work in my test (using the Preview feature of the Stylish extension).
Loe vastust kontekstis 👍 1All Replies (5)
Valitud lahendus
I don't think there is a general purpose solution for this (at least, not without a very clever add-on).
In that particular case, you can use a custom style rule to modify the overlay so that the image remains transparent until you are directly over the icon. Here is a style rule to accomplish that, which you can apply using the Stylish extension or in a userContent.css file.
@namespace url(http://www.w3.org/1999/xhtml);
@-moz-document domain("www.gocomics.com") {
  /* Overlay image generally invisible on hover... */
  p.feature_item:hover span.zoom_link {
    opacity: 0 !important;
  }
  /* ...until you are directly over the magnifying glass icon */
  p.feature_item:hover span.zoom_link:hover {
    opacity: 0.75 !important;
  }
}
It's not possible to confirm from the attached screenshot, but it did work in my test (using the Preview feature of the Stylish extension).
I have no idea how I would use this code. I was hoping there was a variable in about:config that I could change. I'm not a programmer, just a Firefox user.
You don't need to do any programming, but it is a multi-step process:
(1) Install the Stylish extension from https://addons.mozilla.org/firefox/addon/stylish/
After you install Stylish and restart Firefox, its icon ("S" in a square) should appear on the main toolbar.
(2) Select and copy the style rule in the earlier post.
(3) Open a page on gocomics.com for easy testing.
(4) Click the Stylish icon > Write New Style > Blank style. You should get a dialog similar to the one in the above screen shot.
(5) Paste the script into the larger area that has a small 1 at the left. Then click the Preview button and test whether the rule works.
(6) Assuming all is well, give your rule a name and save it. You're done.
The reason it would be hard to create an about:config setting for this is that Firefox doesn't know what is happening visually when you hover your mouse over part of a page. This could activate a drop-down menu, or an animation, or pretty much anything. I can't think of any good way to target just the overlays you don't want, so it's hard to see how it could be built-in to Firefox.
This works. Thanks. It even worked on a comic at comics.com as well as gocomics.com.
Note that isn't that difficult to create a chrome folder in the profile folder and the userContent.css file in this folder.
The customization files userChrome.css (user interface) and userContent.css (websites) are located in the chrome folder in the Firefox profile folder.
You can use this button to go to the currently used Firefox profile folder:
- Help > Troubleshooting Information > Profile Directory: Show Folder (Linux: Open Directory; Mac: Show in Finder)
- Create the chrome folder (lowercase) in the <xxxxxxxx>.default profile folder if this folder doesn't exist
- Use a plain text editor like Notepad to create a (new) userContent.css file in the chrome folder (file name is case sensitive)
- Paste the code in the userContent.css file in the editor window
- Make sure that you select "All files" and not "Text files" when you save the file via "Save file as" in the text editor as userContent.css.
Otherwise Windows may add a hidden .txt file extension and you end up with a not working userContent.css.txt file


