sent Emails going into both email account folders
I have 2 email accounts set up on thunderbird and they have always worked fine, but a few weeks ago things started going wrong, If I send an email on my 1st account it saves a copy in both email accounts sent folders, hence people are replying from my second account instead of the first one.
How do I get the email to put a copy into the sent account of the one its being sent from only, and not in the sent folder of both. I've tried everything
Wszystkie odpowiedzi (1)
Are these accounts POP or IMAP mail accounts ?
Please post the following information Menu app icon > Help > More troubleshooting Information Scroll down to 'Mail and News Accounts' section Copy all info and post it into this forum question.
Just because the 'Write' window says FROM is account A, it does not necessarilly mean you are sending using the smtp server for that account. If account A is a pop account then emails may be saved in Account A, but if it is being sent using Account B smtp server and account B is an imap account then Account B will also have that email in the Sent folder.
In 'Account Settings'
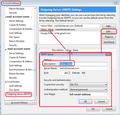
- Bottom of LEFT pane below 'Local Folders' - click on 'Outgoing Server (SMTP )'
It will list all the various outgoing servers and there should be one for each mail account/email address.
- Select the first one - it is usually set as default.
Details are shown below - note the 'User Name' it should be same as email address.
- Click on 'Edit'
- Description - type the same email address as shown in 'User name'
- Click on 'OK'
- Now select the second outgoing smtp server in list.
- Note the 'User name' - it will be different from the first one.
- Click on 'Edit'
- Description - type the same email address as shown in 'User name'
- Click on 'OK'
If you have other outgoing servers for other mail accounts then repeat as above.
Now make sure each account is actually using the correct server.
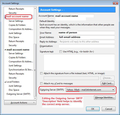
- In left pane - starting at the top - select the mail account name
On the bottom right side you will now see what it is using
- Outgoing Server SMTP: you will see the 'Description' you wrote earlier.
It should match the email address of the account you selected. If it does not - click on the drop down to see options listed and select the correct on DO NOT click on 'Edit SMTP server..' button because if you have the wrong one selected in the first place and you choose to edit it from that button, it will mess things up for the account that is using it correctly.
Then select the next account in the left pane and check to see if it is using the correct smtp server. The Description field should now help you to choose the correct one.
Finally, whilst still in the Account Settings
- For Account name
- Select 'Copies & Folders'
- Select 'Place a copy in'
If POP :
- select 'Sent folder on' and choose the pop mail account name that is the same as the account name
If IMAP:
- select 'Other' and choose the 'Sent on imap mail account name'
Check all the accounts to make sure each one is saving in the appropriate account.
Exit Thunderbird to allow everthing to get properly updated. Wait a few moments for background processes to complete. Start Thunderbird
Example images below as a guide. The first shows method to access all the outgoing servers and get the 'Description' field to be more meaning full. The second shows how to use that DEscription field to make sure the account is using the correct smtp server.


